Loved this week’s sketch over at Mojo Monday! I just love the circles and simplicity of it. This sketch was perfect for a retirement card for my Dad’s friend Cam. We’ve known him for 31 years! Such a long time and such a great guy, pretty much my adopted uncle. 🙂 I used the Cherry on Top designer paper which is so fun and colorful! This isn’t the best picture, so I apologize, but I was pressed to get this posted! This would be a cute birthday card too! Thanks for stopping by!
Month: September 2015
My Silly Little Girl, Potty Training & a Picture Storage Solution – Finally!
I love being a mom. More than that, I love being a stay-at-home-mom. It’s definitely a FULL-TIME JOB. 🙂 It’s worth it. It is hard at times…but worth it. I have a 3 year old that has almost mastered potty training but it has taken a long time. I never pushed him or forced him when he wasn’t ready. I thought he would show interest but never did to my dismay. Finally after he turned 3 this June, and when I thought he would be in Pull-Ups forever, we got serious. We put up a sticker chart (I printed one I found online HERE) and I taped to it a small picture of a toy he had been eyeing for a while.
I said if you just sit on the potty, pull down your pants, flush the toilet or wash your hands you get a sticker. (of course for making a pee or poo too but he wasn’t at that point yet) When the charts are filled up with stickers, you will get your toy! He wanted to sit on the potty. So he did and he helped me flush the toilet when I went and he started to get interested. I also had underwear ready for him to wear. Finally a couple weeks ago he went pee pee in his little potty! He was SO happy he made a pee pee. I praised him A LOT plus he got stickers and ONE M&M candy. After doing this for about 2 weeks he would forget about the M&M’s and sometimes the stickers, he was just excited to make something in the potty. We used 3 charts since he started to fill them quickly. We ordered his toy for him and told him that was for filling up his chart. After a couple days of a dry pull-up I put underwear on him. I also said if you need to make a poo poo just sit on the potty. He only goes #2 once a day so I thought if he has an accident it won’t be that bad. He only pooped two times in his underwear and you could tell he didn’t like that. The third day he went into the bathroom and came out saying he made a poop. I went in and didn’t see it. Uh oh…just like the Clorox commercial lol. I said where is the poo poo Wyatt? He said under the towel. So I lifted the towel and sure enough the poop was under the towel. I’m not sure how it got under there but I think he just squatted and went. (Clorox bleach to the rescue!) I told him next time just sit on the potty buddy. The forth day he didn’t go and in the evening he said my tummy hurts. I said well if you go poop in the potty you’ll feel better. The fifth day he went into the bathroom and closed the door. He came out and said I made a poo poo Mommy. I was scared to go look, but he said come see! I went in to find a very large poop in his potty! I was SHOCKED (at the size of the turd and also that he actually went in the potty). He was so proud of himself! I praised him and I said mommy is so proud of you! He has been pooping in there everyday and stays dry all the time. It’s been about 1 month since we started this! We just put a pull up on him at nap and at night (just in case) but usually he wakes up dry after his nap. Now we are trying to conquer going places and having outings in dry underwear. If you have any tips on that, please comment! Right now we have a little potty in the back of our truck. Not sure how to get him to use a public toilet. I might have to use cheerios and have him start standing up to go. This is the toughest thing I’ve encountered with raising my kids, but I said that about everything else with them! LOL! I’m sure I’ll look back and say, that was easy! hahaha
So that brings me to this picture of our little Sophia. Naturally she followed her “brah-brah” into the bathroom and was curious. I was picking up toys and came in not 1 minute later to find this! I just love how she was trying to hide. She’s a cute little stinker. I’ll be starting potty training with her very soon!
Sooo because these littles are SO cute, I have like 15,000 pictures of them. I decided I needed to find a picture organization solution so I can start putting albums together and scrapbooking them! I recently found This Life by Shutterfly! I’m loving it. I connected my phone, 2 computers, Dropbox, Facebook and Instagram and it automatically uploaded ALL my pictures, FREE! (it only costs if you upload & store videos) Apparently it will also delete duplicate pictures and organize them by date. I’m no longer overwhelmed with pictures on my computer and I can delete them to save space for other things. If you haven’t tried this, I definitely recommend it!
Thanks for stopping by!
Stampin Up mini Hand Sanitizer with NEW Bath & Body Works pocket bac – Video Tutorial
I’m so excited to share with you this video tutorial! It has step by step instructions for a super cute mini hand sanitizer by Bath & Body Works. You can see my previous post with the step by step written instructions here.
Also you can order this 3-D Fall Class for only $15! The kit will include supplies for 4 of these anti-bac holders (not including the hand sanitizers or stamped images). You will also receive PRINTED color instructions! This is a GREAT ready to go class for anyone! Register HERE.
Thanks for stopping by! Please leave me some love and if you watch my You Tube video give me a thumbs up pleeeeeaaase 😉 xoxo ~Charlene
America’s Tire Company Party Nor-Cal 2015
This past Saturday was AMAZING. Not only did my husband have his company party and receive 2 awards, but the man himself, Chairman and Owner Bruce Halle was an honored guest. He was so sweet, I was blessed to talk to him for about 1 minute! He is such a humble man and just adorable. I wish I could have talked with him for longer and just listen to all his amazing stories about his journey. Guess I’ll just have to finish his book Six Tires No Plan (which I started many moons ago!).
He started his very eloquent speech by giving all of us a very sincere THANK YOU. We were all so touched and of course he did get a standing ovation.
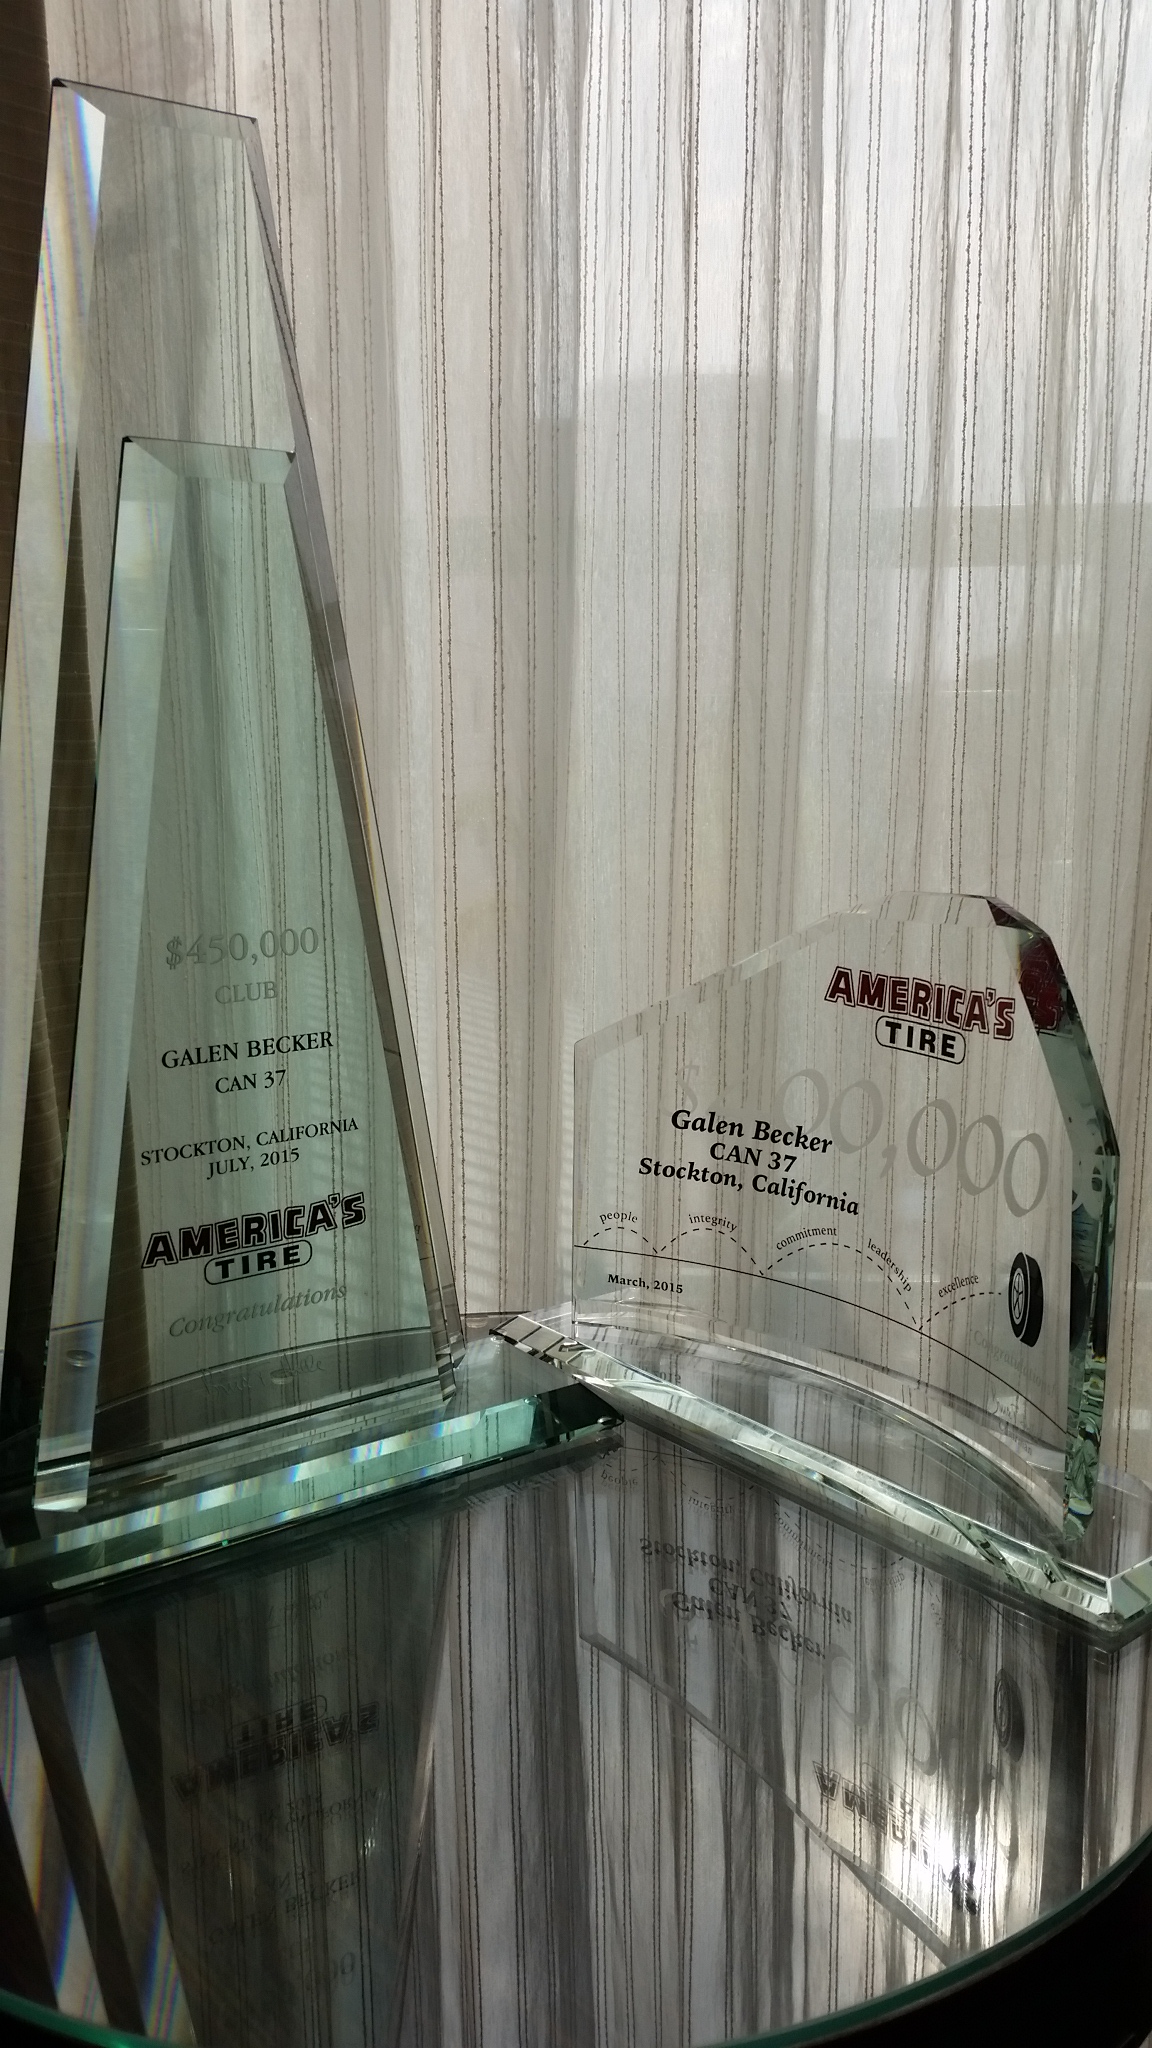
I was so proud that my husband, Galen, and his awesome crew at CAN 37 did a sales record in March ($400k) and then again in July ($450k). He has been a dedicated and hard working Manager, sometimes working 13-14 hour days and it has definitely paid off.
I apologize for the fuzzy picture but I was sitting pretty far from the stage. 😦 Galen did SO well on his speech even though he was definitely nervous. It didn’t show much and he was just amazing. I’m so immensly proud of all his accomplishments. He strives to be the best everyday and it shows. I love him SO much!!!
We didn’t get to go to the party last year because of our little baby. She needed her mommy to go nigh nigh. So this year was especially wonderful. We were greeted at check in at the Hyatt with champagne. Then once we were ready and came downstairs, it was cocktail and appetizer time. Great food! Of course the pictures were a must (kind of like a “prom” picture if you will. I’ll have to upload that one later. Here’s the bathroom selfie! LOL! Well…it was the best lighting. 😉
We had such a great dinner, filet and salmon, broccolini and some really decadent mashed potatoes. Then there was the chocolate lava cake and the NY style cheesecake…oh my gosh…I wish I could have at them all! I ate most of my lava cake and a little of my husband’s. They were just divine!
And here are a couple of my very good friends, Tracy on the left and Alisha on the right. Alisha and I had fun getting ready together! She helped me start and pause a Youtube make up tutorial video. Which was amazing!I also rented a dress for the first time on the site Rent the Runway. Here’s a link to my amazing Nicole Miller dress! I got the most compliments – ever! I felt SO beautiful and more importantly, comfortable!
We had such a great time! I honestly can’t wait until next year. Thank you Bruce Halle for ALL you do for us. We are blessed!!! (and even more so now that we all have our little guardian angel pins) ❤
Stampin Up Season of Cheer & Your Presents Card for Mojo Monday 415
Hello Friends!
Here is the sketch from over at Mojo Monday! I must say, this is a very easy and super cute sketch! I was able to think of a card immediately. I finally got to use my watercolor paper!!! I love the design paper, Season of Cheer and it’s watercolor, hand painted images…so beautiful! It coordinates great with the watercolor paper.
I used an aqua painter and just picked up the Soft Sky color from the lid of my stamp pad (just use the “squishy, squishy” technique lol. (That’s where you squeeze the ink pad a few times before opening it so that color will get on the lid. 🙂 Also, see the Cherry Cobbler cardstock on the sides of the poinsettia paper? I only used 2 small strips for that 🙂 This is just a trick I use when I want to save on paper or don’t have enough paper, or if I’m trying not to make the card too thick!
I stamped the little bow 2 times, once upside down, then cut it out. Super easy and cute! Love the gold glimmer paper with the embossing!
I hope you enjoyed my card, if so, leave me a comment! See below for all the stamps & supplies I used for this project. Thanks for stopping by! 🙂
Built for Free Using: My Stampin Blog
3-D Anti-Bacterial Holder Tutorial & NEW CLASS – New style from Bath & Body Works! Register online! Ships October 1st!
Hey Y’all! I was SO excited to see a new pocket hand sanitizer (Anti-Bac) from Bath & Body Works! It’s smaller and it’s oval! So now it fits in the oval punched paper holder better and it saves card stock since the box is shorter. 🙂 I used the tutorial by Erica Cerwin and modified it a bit. My step by step video tutorial is HERE.
Here is how I put this cute hand sanitizer box together: Start with a 3″ x 9″ piece of card stock.
Score the long side at 1″, 2″, 5″ & 6″. Fold on the score lines and set that aside. Then work on the bottom piece. Cut a piece that is 1-1/2″ x 6″. Score on the long side at 1/2″, 1-1/2″, 4-1/2″ and 5-1/2″. Then turn the piece at score it on the short side at 1/4″ and 1-1/4″.
Then fold on the score lines and cut off the corners of the small piece. You can then apply your adhesive (I prefer sticky strip). Then you can use the oval punch to punch the center.
Then you’re ready to peel the back off the sticky strip and put your box together! I like to adhere one side, then the front, then the other side, then the back.
I’m also excited to announce that I have a 3-D Hand Sanitizer holder kit for purchase. It’s $15 (shipping included, and you get everything pictured here PLUS a PDF file instructions. (does not include stamped images or the pocket anti-bac) They will be all ready to put together with sticky strip on them (you would just peel it off!).
Just register HERE by the 25th and I will be shipping them by the 1st. If you just want the instructions in a PDF file it is $5.00. (select which one when you register)
The stamp sets I used are Amazing Birthday, Grateful for You, Howl-O-Ween Treat and White Christmas. You can view these and all the other products I used by clicking the items below.
My step by step video tutorial can be viewed HERE.
Built for Free Using: My Stampin Blog
Mojo Monday 414 – Contest
Well, that weekend went by super fast. 😦 I love those long holiday weekends, playing in the pool with the kiddos, having a BBQ (or going to one in our case), cold beer, spending time with family. My mother in law came to visit this weekend. She is so sweet, she brought me some jewelry. She loves to find great pieces at consignment/resale stores and sometimes she gives me her own pieces. It’s just a thing she does and I think it’s so special. This weekend I got to work on her wedding invites for her wedding in October! So fun! (I would not have her use store bought ones) 😉
Besides that, I was working on some tutorial videos which I will talk about here but also share in another post. Very fun stuff! But here is the card sketch for over at the Mojo Monday blog….
I had lots of ideas for this card….here is something coming together…I just love the Flower Patch stamp set with matching Framelits! I didn’t end up using the Blackberry Bliss. It seemed to dark to me as this was for a sympathy card.
And here is my finished card. I used Mint Macaron for my base. (5-1/2″ x 4-1/4″ size A2 card) I also used the Butterflies Thinlits. The Fine-Tip Glue pen works great for these types of die cuts. Check out my video HERE on how to use the Fine-Tip glue! I share a cute Halloween Anti-Bac holder in the video! Enjoy and thanks for stopping by!
Built for Free Using: My Stampin Blog
Stampin Up Holiday Catalog is HERE!!!
Hopefully some of you have been catching all my sneak peeks and now you can finally order from the new Holiday Catalog! Order your favorites now while supplies are in stock! 🙂 I know I did & will order more ASAP! There is SO much to love in this catalog.

I have too many favorites to list them all, but here are some MUST haves! I either already ordered these or definitely will this month. I’m already planning my Holiday card classes and will be posting them up in October!!! To see more on my online classes click HERE. To see more about my in-person classes, go HERE.
Built for Free Using: My Stampin Blog
Mojo Monday 413 – Amazing Birthday & Cherry On Top DSP
Just a quick post since I’m doing this at 2:45AM! Ugh! I was trying to get it up here on Monday…I will pay for this tomorrow when my toddler comes in my room around 7:00 AM saying “I NEED MIIIILK”. He loves his vitamin D milk. 🙂
So here is the tall & skinny sketch from over at Mojo Monday. I love that this is a 3.5″ by 5.5″ inch card as opposed to the standard A2 (4-1/4″ x 5 1/2″). You would just use a 3.5″ x 11″ piece of card stock scored at 5.5″.
For this sketch I instantly thought of Amazing Birthday! I love the 1-1/4″ circle stamps that it has. So easy to stamp & punch! I love love love the Cherry on Top Designer Series Paper, it is so, well, YUMMY!!! Get some, you won’t regret it.
Here are the products I used for this card:
Built for Free Using: My Stampin Blog
Sorry such a quick post! Stay tuned this week for the Tuesday deals and a quick video using some of those products! Thanks for stopping by!
September Stampin’ Up Card Class, In Person, Online or Email option; Thankful Forest Friends with Into the Woods Designer Paper
I’m SO excited to be starting my classes online! I’ll be offering my kits for purchase, which will include everything you need to stamp the above 4 cards. (Except stamped images!) Complete supply list and shopping list will be included in the directions.
You have 3 options to purchase this kit:
- In person: My class will be on September 20th from 2pm-4pm at Mountain Mike’s Pizza, 3609 Bradshaw Road, Sacramento, CA.
- Online: $15 or waived with a minimum order. Just place your online order on my website of more than $25 merchandise, and use host code SYGEWYZC. I‘ll mail out the packets and email directions on September 25th. Please note** Do Not Choose – No Contact – when you place your order. This is so I can see where to ship your packets! I cannot see who is ordering when your online account is set up with no contact.
- Email only: Receive the printable PDF directions, by September 25th for all the cards with complete supply and shopping lists for only $10. These are my in-class directions sheets and contain full measurements and step by step directions. The photos have not been watermarked and the sheets do not have my name on them, so they are demonstrator friendly to reuse them for a class. You may offer the sheets for free with any $25 order.
Markers: Early Espresso, Tip Top Taupe, Old Olive, Mossy Meadow, Rich Razzleberry
To celebrate my first month, your ONLINE kit purchase will include a FREE embellishment kit! (Not valid for the in-person class or email) These are hand picked items by me! Sometimes I will include retired items or something made by me (like “card candy”), but mostly, they are current Stampin’ Up items. It’s a great way to try new products! 🙂 Here is a picture of this month’s FREE embellishment kit! (I reserve the right to make substitutions) 😉