Dinners, food, Recipes, soup, Uncategorized

30 Minute Amazing Pozole…Delicious!

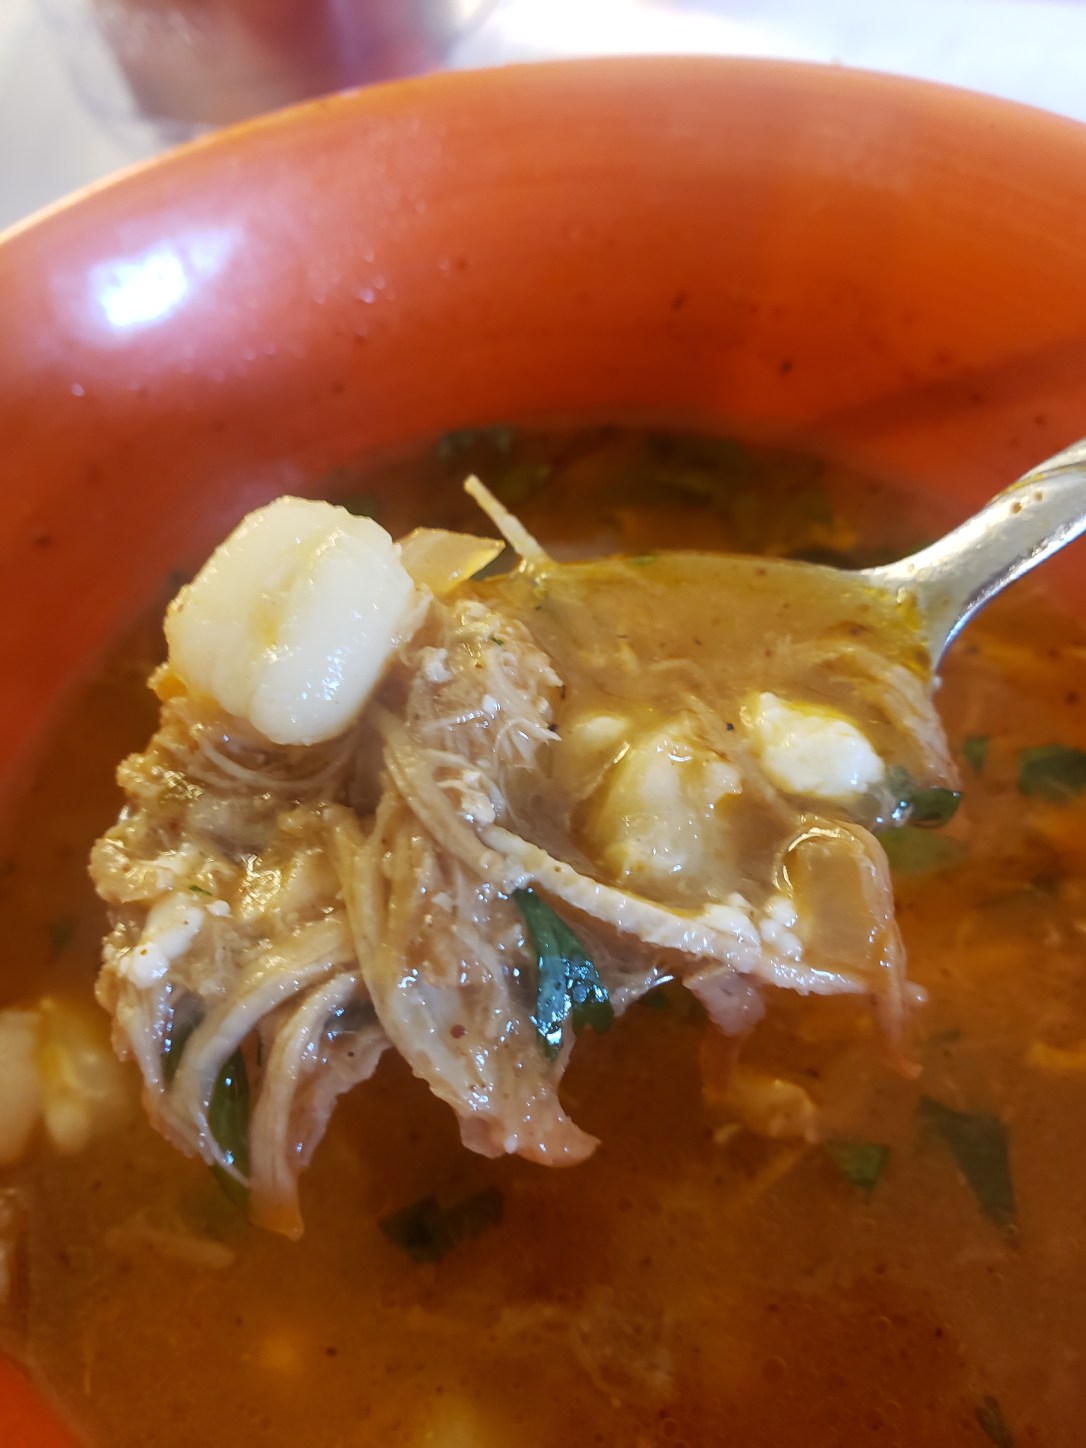
People. You need to try this soup. The cold weather hasn’t left us completely so I must strongly encourage you to make this because you won’t regret it! I found a recipe on Pinterest and tweaked it to make a quick, delicious Pozole that tastes like it was simmering for hours. Please try it, and use up your leftover carnitas! (Or shredded chicken!)20200404_134401

Isn’t it gorgeous? Okay, enough chatting,  here is the recipe:

30 Minute Amazing Pozole

2 T canola or vegetable oil

2 T flour

1/2 small yellow onion,  chopped small dice

1/2 T Chili powder (more if you like it spicy)

1/2 can tomato paste (if you don’t have it, sub in marinara or tomato sauce!)

1/2 tsp cumin

1/2 tsp garlic powder

1/4 tsp cayenne powder (if you really like heat, I did not use it)

1 tsp salt

2 cups water

3 cups chicken broth (I use water and chicken bouillon)

15 oz can hominy

2 cups leftover carnitas (shredded pork or use shredded chicken)

1 lime

Handful of cilantro

Cacique queso fresca or Cotija cheese

Directions:

In a soup pot, heat oil over medium high heat and add your diced onions. Sauté until soft and translucent.  Add a pinch of salt. Add the flour with the chili powder and saute for a couple more minutes continuously stirring.

Add the 2 cups of water, tomato paste, garlic powder,  cumin, and salt. Stir to combine. I also squeezed in 1 lime wedge, just because! Let mixture thicken slightly, then add the chicken broth,  shredded meat and hominy (drained). Cook for another 10 minutes or so until heated through.

Serve topped with rough chopped cilantro and a sprinkle of queso fresca.

*if you like heat or spice, you can add more chili powder, cayenne or diced chiles.

20200404_140837

Hope you give it a try! Let me know if you do and what you think!

❤Charlene


Advertisement
cooking, Dinners, food, Recipes

Macaroni Grill Copycat Pasta Pomodoro Yummmm

photogrid_15647057415245385442654472916802.jpg

Here is how I made this awesome, beautiful copycat version of Macaroni Grill’s Pasta Pomodoro. This dish only has 5 ingredients! It would be amazing and very impressive for a date night. Pair this with a simple salad like a Cesar and some crusty french bread and you just can’t top it. A nice Chianti or red wine would pair nicely with this rich, red sauce.  It’s my go to pasta dish when I want something quick and semi healthy! 😉

So here we go:

Pasta Pomodoro
Ingredients:
4-6 fresh tomatoes, chopped (I used 4 small campari tomatoes and 1 heirloom)
2 Tablespoons of fresh garlic, chopped (or less if you’re not a fan)
1 small bunch of fresh basil, chiffonade
1/4 cup of your favorite marinara or tomato sauce
1/2 – 1 pound Angel Hair Pasta
Other pantry ingredients: good olive oil, kosher salt or any sea salt

Start a pot of boiling water for the pasta and while that’s going, start on your sauce.

Start with your pan on medium heat and add about 2 Tablespoons of the olive oil. Also add the garlic at this time and WATCH it. Stir often and watch it soften for just about a minute or less. You do NOT want to brown it. Browned garlic is bitter and not good.

The garlic will infuse the oil and it will make this dish YUM! After about 30 seconds to 1 minute swirling the garlic around, add the tomatoes. You can stir occasionally. We are just trying to infuse the tomatoes with the garlic oil and break them down a little so they are soft and flavorful.

After about 5 -8 minutes you can add the marinara/tomato sauce. This helps the sauce to have a richer flavor.  If the tomatoes look like they are drying quickly, turn your heat down and add the sauce sooner. I personally LOVE the Victoria Trading Company Marinara Sauce Old World Style. This is an AMAZING sauce! If you haven’t tried it, I highly recommend it! Here’s a picture:

Victoria Marinara Sauce Old World Style

After adding the sauce, you can add 1/2 of the basil so those flavors can meld together. Add the pasta to your boiling water and after about 7 minutes it should be al dente. Use tongs to add the pasta to your sauce and toss. Also at this point you can taste your sauce to see if it needs any salt.  Top and mix with the rest of the fresh basil. (Optional: add some fresh grated Parmesan or pass it at the table) – I don’t think it needs it, but hey, if you like it that way, go for it!

Serve with your side of salad and a warm french bread! This is also a terrific side dish for Chicken Marsala or Chicken Piccata.

This takes me back to when my sister and I would go to the Macaroni Grill for lunches and get the 1/2 and 1/2. I think my recipe is pretty darn close to the real thing!

I hope you enjoy it and please give me a shoutout or comment if you try it!

Happy Cooking & Mangia!

Charlene


Breakfast/Brunch, cooking, food, Recipes

Fig, Arugula & Carmelized Onion Flatbread Recipe

Hi my Lovlies!

I got these beauties at the Farmer’s Market, as you can see from my below post. If you are lucky enough to find figs, I would suggest a Fig, Caramelized Onion, Arugula & Feta Flatbread!  With homemade flatbread of course! Here are the recipes that I used…and if you don’t like arugula, use spinach! If you don’t like feta, use brie! You can customize it however you like!

20190702_1559393380768729222148603.jpg

I stumbled upon this lovely flatbread recipe that worked great in the oven!  – If you don’t have Pinterest, here is a link to her recipe on her blog.

Once I rested the dough, I floured a surface and rolled it out. I cut it into wedges as shown here and put it on my lightly oiled Pampered Chef Large Bar Pan. You can rise it again since it is a yeast dough, but I wanted it pretty flat and I knew it would puff a little in the oven. I flipped it halfway through baking. I believe I used 350 degrees for about 10 minutes a side. Times and ovens vary, so I would just experiment with it.

20190702_1913034682845305547385191.jpg

While my dough was cooking in the oven, I was sauteing my sliced onions in a little butter until they were very soft, then I added a pinch of salt and continued until they were nice and caramelized! At the same time I also roasted the figs. To prepare those, I sliced them at about 1/4″, lightly oiled a baking sheet, then topped with a little more olive oil, honey and a sprinkle of brown sugar.

20190702_1913115164565258562967258.jpg

After that I assembled the ingredients back on the flatbread and popped them back into the oven for about 10-15 minutes. Just until the cheese was melted and the ingredients melded together.

Here’s how I topped them: I brushed them with a good Lebanese olive oil, sprinkled with feta cheese, layered on the onions, then the sliced figs, fresh arugula and then more feta. I left a couple pieces of flatbread plain for the kiddos. (they LOVED it)

20190702_2002466707258153374851027.jpg

Here are slices of my amazing, delicious finished flatbread! I loved the savory of the onions and arugula with the sweetness of the figs. The cheese was mild and brought it all together! I shared this as kind of an appetizer with my mom friends while our kids played at our apartment complex park. They raved about this! A couple of them are borderline vegans, so it was divine for them. You could even drizzle a little truffle oil on top to be extra decadent! ❤

20190702_2023205082549838022878101.jpg

Hope you give this a try and love it as much as we did!!

Happy cooking!

Desserts, Dinners, Meal Planning, Recipes

Meal Plan Week #2

HEARTY TUSCAN SOUP WITH PARMESAN CROUTONS

ASIAN CHICKEN LETTUCE WRAPS

CHICKEN, BACON & RANCH PIZZA

EASY WEEKNIGHT CHILI (FOR ROCKCROK XL

CREOLE GUMBO WITH CORNBREAD MUFFINS  (5 star recipe!)

CREAMY LEMON-PESTO CHICKEN & LINGUINE

BRUSCHETTA PASTA

And for dessert….

MINI CLASSIC VANILLA BUNDT CAKES

OR

EASY FUDGE BROWNIES

Click HERE for entire grocery list! Hopefully this will save you some time in the kitchen. I am also hoping you will enjoy these healthy, quick meals. Stick around to see Week #3’s meal plan too! xoxo

Happy cooking,

Charlene


Dinners, food, Meal Planning, Recipes

Meal Plan Week #1

TOASTED ORZO SKILLET WITH SHRIMP

ROASTED CHICKEN & ASPARAGUS WITH PAN SAUCE

CHEESY SHELLS & ITALIAN SAUSAGE

MOROCCAN WHITE BEAN TURKEY CHILI

ONE POT SAUSAGE & KALE PASTA

BROCCOLI-CHEDDAR CHICKEN NUGGETS

TACO RING


Click HERE for entire grocery list! Hopefully this will save you some time. I am hoping you will enjoy these healthy, quick meals. Stick around to see Week #2’s meal plan too!

Happy cooking,

Charlene

Breakfast/Brunch, Recipes, Uncategorized

Zucchini Deep Dish Pie (Quiche) by Pampered Chef – Modified

Zucchini Deep Dish Pie

  • Servings: 8-10
  • Difficulty: easy
  • Print

zucchini pie

Ingredients

    Crust

  • 1 package (8 ounces) refrigerated crescent rolls
  • 2 teaspoons Dijon mustard
    Filling

  • 4 cups thinly sliced zucchini (3-4 small)
  • 1 cup coarsely chopped onion
  • 2 tablespoons butter or margarine
  • 1   garlic clove, pressed
  • 1/2 teaspoon Italian seasoning (I increased this to 1 tsp)
  • 1/2  teaspoon salt (I increased this to 1 tsp)
  • 1/4 teaspoon ground black pepper ( I increased this to 1/2 tsp)
  • 2 tablespoons snipped fresh parsley
  • 2   eggs
  • 1/4 cup cream (I added this to mine)
  • 2 cups (8 ounces) shredded mozzarella cheese

Directions

  1. Preheat oven to 375°F. For crust, unroll crescent dough; separate into triangles. Arrange evenly in Deep Dish Pie Plate with points toward the center. Using lightly floured Baker’s Roller®, roll dough over bottom to seal seams. Press dough halfway up sides to form a crust. Spread mustard over bottom of crust.
  2. For filling, slice zucchini using Simple Slicer Set blade to #2. Coarsely chop onion using Food Chopper. Melt butter in (12-in.) Skillet over medium-high heat. Cook and stir zucchini, onion, garlic, Italian seasoning, salt and black pepper 4-5 minutes or until vegetables are crisp-tender. Remove from heat; stir in parsley.
  3. Whisk eggs & cream in Classic Batter Bowl. Stir in cheese. Add vegetable mixture; mix well. Pour vegetable mixture over crust, spreading evenly. Bake 25-30 minutes or until center is set and crust is golden brown. Cut into wedges to serve.

Side Note: I increased the seasonings and I would say it was just right. You may need to taste your zucchini after it is done sauteing to see if it has enough flavor. I feel like the cream gave it a little bit of richness but not too much.


Enjoy!