
Hello Again Ya’ll! Happy Friday! Am I Southern? No, but I just love saying Ya’ll. It sounds so much better than “you guys”. 😉
So the other day my kids got a spork in their school lunch and didn’t use it. So, immediately I thought, oh my gosh, we could make Forky! Ok, most of you moms are like, “Wow! She’s so crafty!” and the rest of you are probably like “What the heck is a “Forky”? or what the heck is a spork? haha 🙂 Well, a spork is a cross between a fork and a spoon. It’s to be used for either purpose and to save on having several utensils. A “Forky” is one of the new characters in Toy Story 4 if you didn’t know. Don’t worry, no spoilers here. Just some good, clean crafting! Funny thing is they have a kit you can buy to make your own “Forky”. I saw it on a You Tube video and then saw it online at Michael’s which is around $14, but I again was able to find what I needed in our craft tote to make these little guys for free!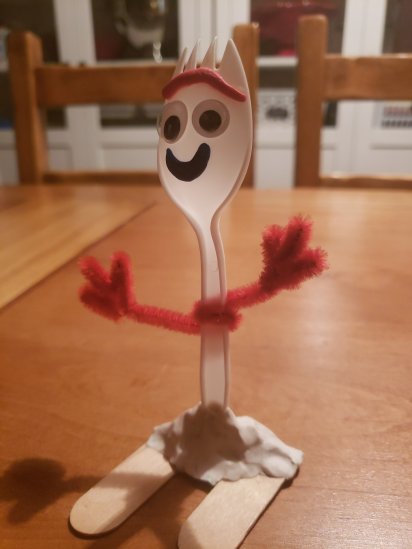
So let’s get started…here is what you will need:
1 spork
Red, white and blue clay or you can use wax sticks (and instead of clay, you could use salt dough!)
2 googly eyes (small and an extra small one)
1 red pipe cleaner
1 large Popsicle stick
- Take your clay and roll it into the shapes for the eyebrow (unibrow) haha and the mouth. The other style of mouth can be a circle, but my kids preferred a smile. If you don’t have the clay, you can use salt dough and color it with food coloring.
- Next glue those 2 on with strong adhesive. I used the Tombow glue in the green/white bottle but the E6000 craft glue would work great.
- Glue on the 2 eyes.
- Next take the red pipe cleaner and bend the ends back and forth to make 3 fingers on each side. Then wrap it around the spork body a couple of times so it is secure.
- Then cut the Popsicle stick (tongue depressor) in half, trim as necessary. Mine were 2″ long each.
- Take the white clay/dough and make a little volcano shape and stick the spork in it.
- Stick the Popsicle sticks to the clay, glue if desired.
- If you want, draw on a rainbow just like Bonnie had on her Forky. You can also color the cheeks red then wipe to show a little pink. We did not do that step.

That’s it! Your kids will have their very own “Forky” and LOVE it!!! Mine did!
I hope you enjoy this tutorial and pictures! Let me know in the comments below if you do!
Happy Crafting!
Charlene
